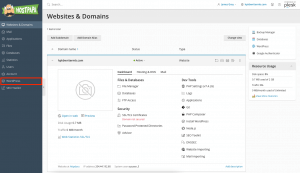
WordPress Toolkit is a management interface that allows you to install, configure, and manage WordPress in Plesk easily. In this article, we’ll show you how to back up and restore WordPress installations in Plesk. Start out by accessing your Plesk control panel through your HostPapa Dashboard.
Please note that WordPress Toolkit can install, configure, and manage WordPress version 4.9 and later, and the extension is free with the Web Pro and Web Host Plesk editions. It’s available for a fee for the Web Admin edition.
How to back up and restore WordPress installations
To help prevent data loss, you can back up and restore your websites. You can do this using either the WordPress Toolkit feature or the general Plesk backup tool Backup Manager.
Creating backups in WordPress Toolkit may be more convenient because:
- WordPress Toolkit backs up individual websites, while Backup Manager backs up the whole subscription with its websites and data.
- WordPress Toolkit backups require less time and disk space for individual websites.
- WordPress Toolkit backups don’t require any setup.
To back up a WordPress website, follow these steps:
1. Go to WordPress.
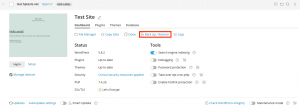
2. Click Back up / Restore on the installation card you want to backup.
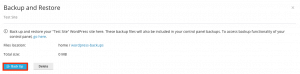
3. Click Back up.
When the backup is complete, it will be displayed on the WordPress Toolkit backup list.
To restore a WordPress website, follow these steps:
1. Go to WordPress.
2. Click Back up / Restore on the installation card you want to restore.
3. Click Restore. You have now restored your backup.
You may want to download WordPress Toolkit backup files to store them somewhere else.
To download WordPress Toolkit backup files, follow these steps:
1. Go to WordPress.
2. Click Back up / Restore on the installation card whose backup files you want to download.
3. Click the download icon corresponding to the backup whose files you want to download. You will be redirected to the File Manager directory, where WordPress Toolkit backups are restored.
4. Click the three-line icon corresponding to the backup file you want to download.
5. Click Download.
You will now have downloaded a backup file. You can delete backups you no longer need.
To delete a WordPress Toolkit backup, follow these steps:
1. Go to WordPress.
2. Click Back up / Restore on the installation card whose backup files you want to delete.
3. Click the trash icon corresponding to the backup you want to delete.
4. Click Delete. You have now deleted the backup.
If you need help with Plesk, please open a support ticket from your dashboard.
